Configuring and Using InstantSend for Salesforce | Predictive Response
Configuring and Using InstantSend for Salesforce
InstantSend for Salesforce (ISA) is a plug-in that you can use if you have installed the Predictive CampaignFlow. CampaignFlow adds new or existing leads/contacts to the specified campaign in Salesforce. ISA coordinates using a Salesforce email template to send emails.
In other words, if CampaignFlow adds a contact to a campaign and InstantSend for Salesforce is selected as a Trigger Action, the new member will be sent the emails from Salesforce following the Salesforce limitations.
If you have installed CampaignFlow and are using the Adaptive Mailer, then click here for more information on our InstantSend for Predictive plug-in.
Configuration
- Campaign Page Layout
- Campaign Member Page Layout
- Organization Wide email addresses
- InstantSend Scheduler
- Using InstantSend for Salesforce
- Reports
- FAQ
Campaign Page Layout
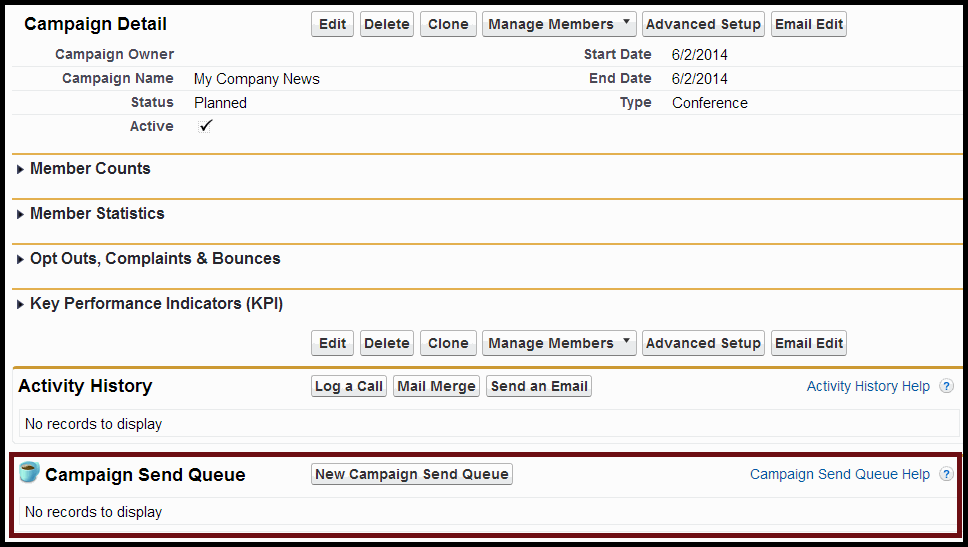
Email Edit button
To add the Email edit button to your campaign page layout(s):
- Go to Setup
- Customize
- Campaigns
- Page Layouts
- Select a page layout to modify
- Add the Edit Email button to the Custom Buttons section at the top of the page
Back to Top
Campaign Send Queue Related List
Salesforce has email sending limits in place that can affect your campaign. It is possible that not all the members in your campaign can be sent your email in the first day. We have created a Campaign Send Queue related list that can be added to your campaign page layout. This section will let you see which emails have not been sent yet. To add the section:
- Go to Setup
- Customize
- Campaigns
- Page Layouts
- Select a page layout to modify
- Select the Related List option in the layout grid
- Drag the Campaign Send Queue item to the related list section on the page
![]() Reference: For more information on Salesforce email sending limits, click here.
Reference: For more information on Salesforce email sending limits, click here.
Back to Top
Campaign Member Page Layout
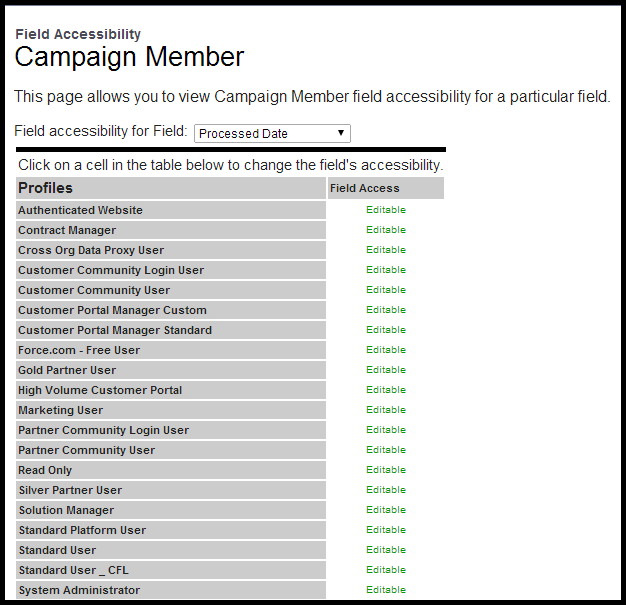
The processed date field will be updated when the email is sent to the campaign member. It is important that this field is set as visible. To confirm this is the case:
- Go to Setup
- Customize
- Campaigns
- Campaign Members
- Locate Processed Date in the Custom Fields & Relationships section
- Visible box should be checked for all appropriate profiles
Organization Wide Email Addresses
All users that are also campaign owners need to have an organization wide email address created. To do so:
- Go to Setup
- Administer
- Email Administration
- Organization-Wide Addresses
- Click the Add button
- Display Name: The name that will appear in the recipient’s inbox
- Email Address: The email address for the user/campaign owner
- Each user added will receive an email from Salesforce requesting that the verification link is clicked. Make sure your users are aware that this link expires after 72 hours.
Back to Top
InstantSend Scheduler
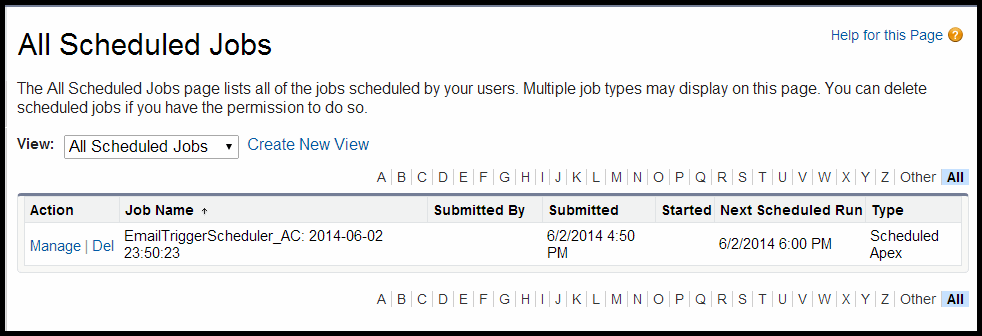
The Scheduler is designed to determine when your emails are sent. To start the scheduler, go to the tab and click the Schedule button. After clicking the button you will see a confirmation message.
This action will add an item to your Salesforce scheduled jobs. As already noted, Salesforce limits the number of emails you can send on a daily basis. That limit is reset at midnight UTC. Our send schedule defaults to a send time of 1 AM UTC.
If you want to change the scheduled start time, you can access the job by going to:
- Setup
- Jobs
- Scheduled Jobs
Back to Top
Using InstantSend for Salesforce
The following steps are needed to successfully send emails using InstantSend for Salesforce:
- Create a Salesforce campaign
- Create a Salesforce email template
- Create a Predictive CampaignFlow with the trigger action set to InstantSend for Salesforce
![]() Reference: Click here for more information on creating flows.
Reference: Click here for more information on creating flows.
- Next, set the template to be used for the campaign by clicking the Email Edit button
- As leads and/or contacts are added to the campaign, emails are sent following the Salesforce email limits.
- When/if you exceed your daily Salesforce email limit, the emails will be queued to be sent in the next scheduled batch.
![]() Note: Using the Run Immediately button in the InstantSend Scheduler, will send your emails immediately if you have available emails within the Salesforce mass email send limits.
Note: Using the Run Immediately button in the InstantSend Scheduler, will send your emails immediately if you have available emails within the Salesforce mass email send limits.
- Sent emails will be listed in the Activity History section and unsent emails will be listed in the Campaign Send Queue section of campaign page.
Back to Top
Reports
The installation of InstantSend for Salesforce includes the following two reports:
- Emails Sent Today: This report will provide an exportable list of names and emails that were sent from a campaign using InstantSend on the current day.
- Send Queue: This report provides a list of the emails that have not been sent as of the current day,
![]() Information: These reports can be found on the Salesforce Reports tab in the Predictive CampaignFlow Reports folder.
Information: These reports can be found on the Salesforce Reports tab in the Predictive CampaignFlow Reports folder.
Back to Top
FAQ
Why are my emails not sending?
Have you added the required pick list value to the CampaignFlow Trigger Action field?
Is the logged in user set up with a Organization-Wide Email Address? If you have not created one or more organization wide email addresses, the logged in user will display as the sender in the recipient’s inbox. Any emails that end up in the campaign send queue will remain there until such time as an organization wide email address is created. Click here for more information.
Have you created an email for your campaign? If you have not created an email for the campaign, no emails can be sent. However, your recipients will be listed in the campaign send queue and when an email is created; the emails will start sending, following the Salesforce limit, at midnight.
Back to Top
 (0)
(0) (0)
(0)


