Using CampaignFlow | Predictive Response
Using CampaignFlow
CampaignFlow automates the process of adding leads and contacts directly into a campaign based on any combination of field values. Instead of running and re-running reports to make sure you have all leads and contacts that match your report criteria.
![]() Reference: Click the links below for more information.
Reference: Click the links below for more information.
- For information on configuring CampaignFlow, click here.
- For information on configuring and using InstantSend for Predictive, click here
- For information on configuring and using InstantSend for Salesforce, click here
- For information on configuring and using OpportunityFlow, click here.
![]() Important: Each CampaignFlow can be associated to one campaign and only one campaign. A campaign can have more than one flow associated.
Important: Each CampaignFlow can be associated to one campaign and only one campaign. A campaign can have more than one flow associated.
To create a new CampaignFlow, open the campaign in Salesforce and click the New CampaignFlow button. Complete the following fields:
- Name: Enter a unique name for easy reference.
- Campaign; Auto defaults to the open campaign, can be changed as needed.
- Description: Optional, enter as desired.
- Active: Check or uncheck as desired.
- Object: a CampaignFlow can work with leads OR contacts. If you require that it works with both, add two flows – one for leads and one for contacts.
- Condition Type: Choose Or/And as desired. If the condition equals OR, then any of the values entered will when matched add the lead/contact to the campaign. If the condition equals AND, then all of the values entered have to match before the lead/contact is added to the campaign.
- Existing Lead/Contact: The flow will review changes to existing leads/contacts and trigger the action.
- New Lead/Contact: The flow will review the data entered for new leads/contacts and trigger the action.
![]() Information: A flow can be used to add both new or existing leads/contacts – just check both boxes to enable this option.
Information: A flow can be used to add both new or existing leads/contacts – just check both boxes to enable this option.
- Change Status: Select this if your intent is to change the status of an existing campaign member
- Campaign Member Status: Use the picklist to select the new status for a existing campaign member or to add leads/contacts to the campaign with a specified status.
![]() Important: When you create a flow that changes member status, InstantSend is not utilized because that plugin is designed to send an email and changing the status does not involve that action. To make sure that Predictive know that the campaign member status has changed, click the Auto Sync box on the campaign page. For more information how the synchronization process works, click here.
Important: When you create a flow that changes member status, InstantSend is not utilized because that plugin is designed to send an email and changing the status does not involve that action. To make sure that Predictive know that the campaign member status has changed, click the Auto Sync box on the campaign page. For more information how the synchronization process works, click here.
- Field: This displays all standard Salesforce and all custom fields available for the lead or contact record. The list is determined by the object selected for the flow.
- Operator: Select as needed.
- Value: Enter the value for the flow trigger.
![]() Information: Adding multiple values is possible – use a comma to separate the values.
Information: Adding multiple values is possible – use a comma to separate the values.
Actions
There are buttons displayed at the top of the campaignflow page that enable different actions.
- Save: Save your flow when you are done creating or modifying it.
- Clone: Clone the flow if you are going to create another one with the same settings for another campaign or if you are going to use a similar flow for the same campaign – such as one for leads and another for contacts.
- Cancel: Cancel changes
- Delete: Delete the flow.
- Run Now: Use Run Now to run CampaignFlow on all leads and contacts to see if they have data that matches your flow criteria. This is helpful if you have just created a flow or modified an existing flow.
 By selecting ‘run now’, you will be pulling in all existing leads and/or contacts that meet the CampaignFlow criteria. If you have a CampaignFlow that is set for only new contacts and/or leads then you will want to avoid running the CampaignFlow.
- Schedule: Scheduled flows are needed to trigger on any date or formula field that may change value even though the lead/contact record has not changed. For example, every day will get closer to a contact’s renewal date, and you want to trigger an email 45 days before that date. The contact record will not be edited/updated but at some point today’s date will be 45 days before their renewal. A scheduled campaign will run every day at 10AM local time and pick up those contacts that now match your date based CampaignFlow.
 By selecting ‘schedule’, you will be pulling in all existing leads and/or contacts that meet the CampaignFlow criteria. If you have a CampaignFlow that is set for only new contacts and/or leads then you will want to avoid running the CampaignFlow.
Back to Top
Date Based Flows
CampaignFlow allows you to utilize all of the standard Salesforce date literals like TODAY, YESTERDAY, NEXT_N_DAYS:n, LAST_WEEK, etc.
Most of the Date Literals (see Salesforce chart) are self explanatory, however, TODAY +/- N days is not allowed. To accomplish this, your CampaignFlow should look like this:

Back to Top
Examples
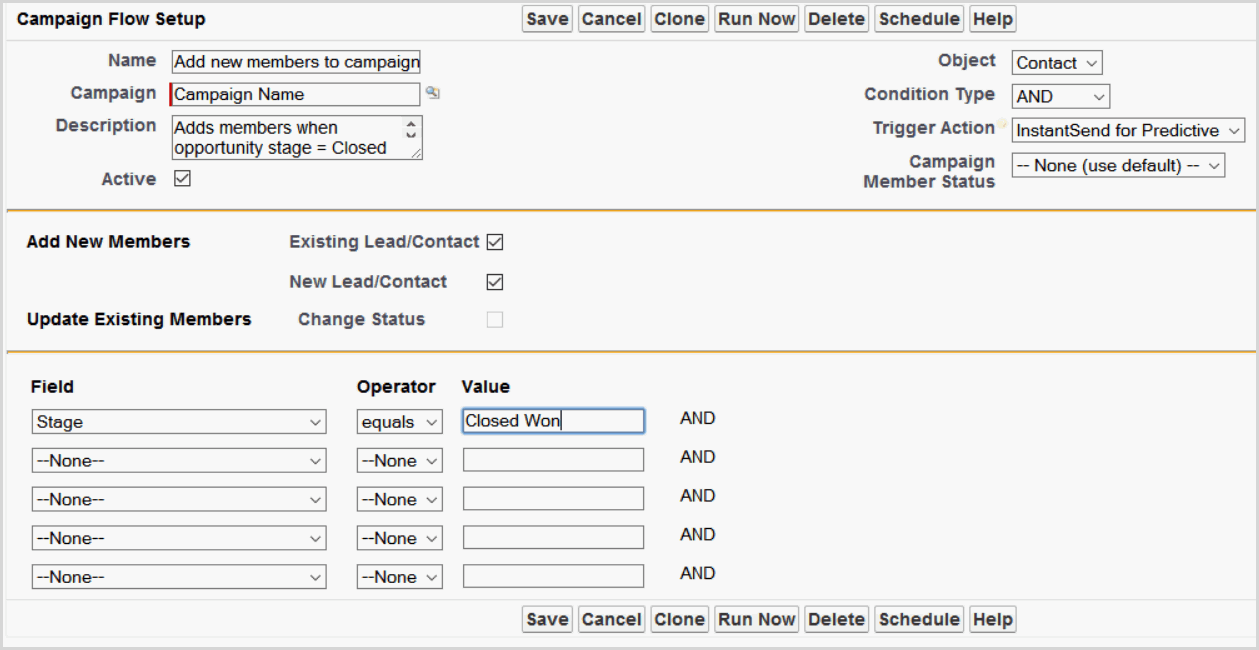
Scenario 1:

This flow will add all existing contacts to a campaign when the opportunity for that contact has been won.
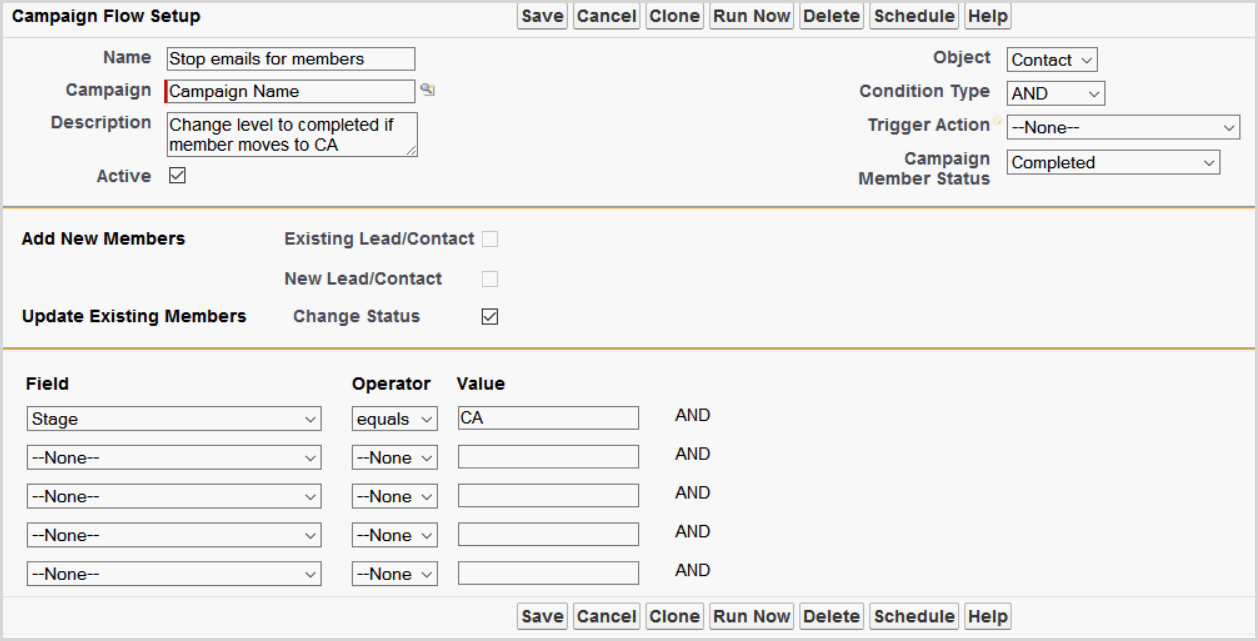
Scenario 2:

This flow will stop contacts from receiving emails from the campaign when their mailing state field is changed to reflect a move to California.
![]() Important: The type of flow shown above will require using our auto-sync feature. Click here for more information.
Important: The type of flow shown above will require using our auto-sync feature. Click here for more information.
We suggest testing your new flow using a test lead/contact to confirm that the flow performs as you desire.
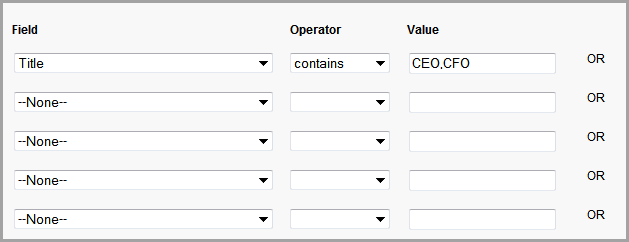
If you want to have your flow criteria look for multiple values in the same field such as adding member with the Title of CEO or CFO, you can use one line item in your flow as seen here. When entering the different values, use a comma to separate the entries and remove all spaces. If the flow has a space in the criteria, the system will look for a space in the lead/contact field and may not add the lead/contact to the campaign.
Back to Top
 (1)
(1) (0)
(0)
