CampaignFlow Configuration | Predictive Response
CampaignFlow Configuration
![]() Reference: Click here to see details on using CampaignFlows.
Reference: Click here to see details on using CampaignFlows.
Information
CampaignFlow can be used with one of our free plugins.
- Click here for more information on InstantSend for Salesforce
- Click here for more information on InstantSend for Predictive
- Click here for more information on OpportunityFlow
Configuring CampaignFlow
Related List
For easy access to a campaignflow associated to a campaign, add the CampaignFlow related list to your campaign page layout. This will provide access to create and manage flows for that campaign. Go to:
- Setup
- Customize
- Campaigns
- Page Layout(s)
- Click Edit for the page layout to be modified
- In the layout grid, click the Related List menu item
- Drag the CampaignFlow related list to your campaign page layout
Use the Wrench icon to add the following columns to the section:
- Name
- Description
- Active
- and any other fields you wish to view
Custom Settings
The CampaignFlow application is not able to manage a mass update of lead or contact data that matches an existing flow. You may see an error message if this occurs. The following options will help with this type of issue:
To temporarily disable CampaignFlow, go to:
- Setup
- Develop
- Custom Settings
- Locate CampaignFlow Settings and click on the Manage link
- Click New and Name the settings “Disable CampaignFlow Settings”
- Then check the boxes you want to disable
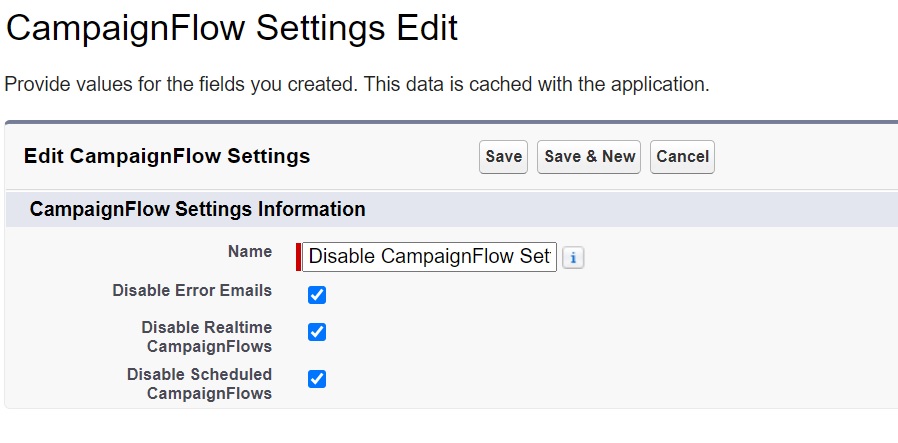
- Disable Error Emails: Use this option if you do not want to receive error emails when a CampaignFlow fails.
- Disable Realtime CampaignFlow: This option allows you to disable all your real-time CampaignFlows at one time. If selected, your CampaignFlows will only run if you use the Run Now or Schedule button.
- Disable Scheduled CampaignFlows: If selected your CampaignFlows will run in real-time
![]() Note: if RealTime CampaignFlow and Scheduled are disabled, all CampaignFlows will not run.
Note: if RealTime CampaignFlow and Scheduled are disabled, all CampaignFlows will not run.
To later re-activate, you can click Edit and uncheck the appropriate field(s).
![]()
CampaignFlow Access Settings
![]() Best Practice: Create a separate Permission Set for the CampaignFlow application.
Best Practice: Create a separate Permission Set for the CampaignFlow application.
If you are using our CampaignFlow application and one or more of the available plugins, the following settings apply.
- Assigned Apps: Required
- Assigned Connected Apps: Not Required
- Object Settings: Required
- App Permissions: Not Required
- Apex Class Access: Required
- Visualforce Page Access: Required
- External Data Source Access: Not Required
- Named Credential Access: Not Required
- Custom Permissions: Not Required
Assigned Apps: Required
- Click Assigned Apps heading
- Click the Edit button
- Move CFL.CampaignFlow from the left to the right
- Click the Save button
Object Settings: Required
Campaign Members
Most of these fields will be included in the PAM Permission Set and will not be modified here. The only field needed for CampaignFlow is the Trigger Action field which should be marked as Read,
CampaignFlow
- Tab Settings: Click so that the tab is Available and Visible
- Object Permissions: Click all the boxes
![]()
Field Permissions
The following should have the Edit box checked:
| Active | Campaign Member Status | Change Status |
| Condition Type | Description | Existing Lead/Contact |
| Field Label 1-5 | Field Name 1-5 | Field Operator 1-5 |
| Field Value 1-5 | Lookup Id R1 – R5 | New Lead/Contact |
| Object | Operator 1-5 | Trigger Action |
The following should have the Read box checked:
| Last Run Now | Schedule Created | Schedule Last Run |
| Schedule Next Run | Server Url |
Apex Class Access: Required
All items with list with CFL as the namespace need to be enabled. Highlight all and click the Add arrow to move from the Available section to the Enabled section.
If you have installed the InstantSend for Predictive plug-in, move all items with ISX as the namespace to the Enabled section.
Visualforce Page Access: Required
All items with list with CFL as the namespace need to be enabled. Highlight all and click the Add arrow to move from the available section to the Enabled section.
![]()
Assign Permission Sets to users
After creating the permission set, it needs to be assigned to an user. to do so go to:
- Setup
- Manage Users
- Permission Sets
- Click on the applicable permission set name
- Click the Manage Assignments button
- Click the Assign button
- Check the box next to each applicable user
- Click Assign when done
![]()
 (0)
(0) (0)
(0)