FAQ: How do I Reactivate Campaign Members? | Predictive Response
FAQ: How do I Reactivate Campaign Members?
There are multiple reasons why your lead and/or contact cannot be sent emails. The top 3 reasons that indicate emails cannot be sent are:
- The lead/contact opted out of all emails from your organization
- The lead/contact’s email address bounced
- Shortcut: Reactivate bounced members
- Reason field displays as “Missing Email Address”
Opt Outs
If a lead or contact has globally opted out of all campaign emails, you cannot send them additional emails, unless they contact you and asked to be reverted to active status. If that occurs, complete these steps:
- Open the lead or contact record in Salesforce
- Click the Opt In button

Clicking the Opt In button will update both Salesforce (Email Opt Out check box) and Predictive if:
- The lead/contact is in any active campaigns, they will receive the current active email (if not already sent).
- The lead/contact is added to new campaigns, they will receive the campaign emails for that campaign.
![]() Information: If the button is not available, and you cannot add it to the lead/contact page layout, contact your Salesforce administrator.
Information: If the button is not available, and you cannot add it to the lead/contact page layout, contact your Salesforce administrator.
![]() Important: Be very sure that the member has provided permission to be opted back into your communications, as doing so without permission can result in the posting of an abuse report against your organization. If you start receiving multiple abuse reports, your sender email addresses may be blocked by one or more of the receiving email servers and your communications will not be delivered to any campaign members using the same email server – not just the abuse reporter.
Important: Be very sure that the member has provided permission to be opted back into your communications, as doing so without permission can result in the posting of an abuse report against your organization. If you start receiving multiple abuse reports, your sender email addresses may be blocked by one or more of the receiving email servers and your communications will not be delivered to any campaign members using the same email server – not just the abuse reporter.
Back to TOP
Bounces
There are many reasons why a lead or contact email bounces. Some of those reasons are:
Non-existent email address
- The email address could have a typo – such as yahooo.com or mjohnsen instead of mjohnson.
- If the email address was for a work location, the lead or contact may have left the company, or the company may have changed their domain.
- If the email address was personal, the lead or contact may be using a different Internet provider.
You may be able to fix some of these emails yourself. Run our Bounced report (located in the Predictive AM campaign member reports in Salesforce) and review for obvious errors.
If you find an email address for a contact should be updated, navigate to that contact or lead record in Salesforce and edit the email address. Save the record, then sync the campaign. If the contact or lead is already marked as “bounced” in a campaign, you will need to reactivate them as described below in the “Reactivating Bounced Campaign Members” section.
Undeliverable email
At times, the receiving email server may be temporarily unavailable or under maintenance.
![]() Note: Predictive sends emails 3 times before marking them as bounced which may help with this type of issue.
Note: Predictive sends emails 3 times before marking them as bounced which may help with this type of issue.
Mailbox Full
If the lead or contact has too many emails in their inbox – maybe because they have been on vacation, this can cause your emails to bounce. Or possibly the lead or contact is no longer using the email address and is not checking those emails.
Blocked email
At times, the receiving email server may block the incoming email. It may consider the email as a spam email for example. Using the Predictive Insight test can help you find out if you are using a subject line or words in the email body that is causing this to occur.
Review these pages available in this user guide for more information:
Reactivating Bounced Campaign Members
To reactivate one or multiple bounced members:
We recommend proceeding with these steps in Salesforce Classic due to filtering limitations on Campaign Members in Salesforce Lightning.
1) Open the campaign in Salesforce
2) Click on the ‘Advanced Setup’ button at the top of the campaign page
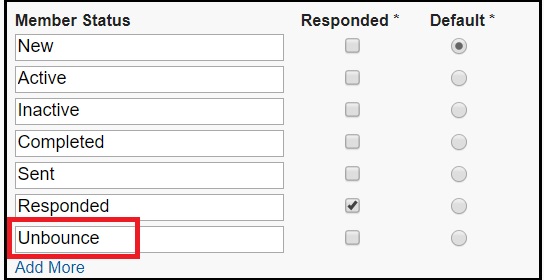
Click Edit then at the bottom of the list, click Add More. Add Unbounce and Save:
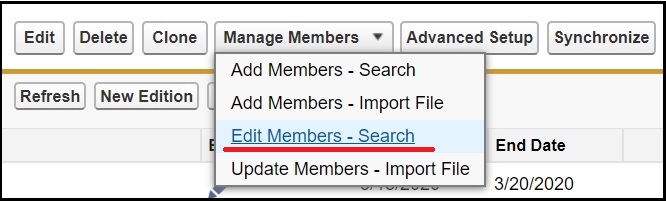
3) Scroll down to the Campaign Members section of the campaign
Select the ‘Manage Members’ dropdown and choose to edit members – search
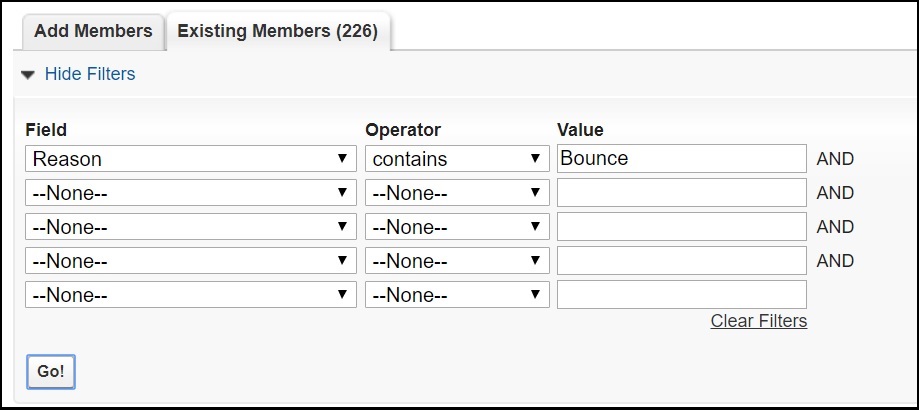
To reactivate all bounced members, under existing members enter the search criteria below, then click Go. Alternatively, you can do a search by email or other criteria to individually locate and unbounce members.
Click on the check boxes to select the bounced members in the Action column
Click the Update Status button
Select Unbounce from the drop-down list
Click the synchronize button located on the campaign page
Your member (s) should become active (may take up to 5 minutes after sync) and receive the next active email in the campaign
Confirmation Campaign
Creating a campaign with all of your members with bounced email addresses is a fast easy way to find out if any of their emails were temporarily or permanently out of commission. Please note, creating an email edition is not required using this option. You can however create an edition if you choose to send a verification message to members, see the best practice after step 9.
- Create a new campaign and call it the Unbounce campaign (this can be re-used as needed).
- On the campaign page, click the Advanced Setup button.
- Click the Edit button and Add More.
- Enter Unbounce in the field, click Save when done.
- Run the Bounced report found in Salesforce reports, Predictive Campaign Member Reports folder.
- Click the Add to Campaign button and add the members to your Unbounce campaign with a status of Unbounce.
- Synchronize with Predictive.
- Confirm that members are showing as active in both Predictive and Salesforce.
- When these members are added to a new campaign, they will be active and able to receive emails
![]() Best Practice: You can also use this campaign as a verification campaign. Create an email that includes content such as:
Best Practice: You can also use this campaign as a verification campaign. Create an email that includes content such as:
Hello {{$first_name}},
We are confirming that we are using your preferred email address for our organization’s communication. If you wish to change the email address we are using, please click here to send us an email with your request.
Thank you for updating your preferences.
Link the word “here” to the email address being used to collect the information.
![]() Important: Using this optional step may result in a high bounce rate for the campaign. If you are using the SES email platform, this can result in a probation warning email from Amazon. We advise that if you wish to use this option, send an email to support@predictiveresponse.com so that we can assist in determining the best way to manage the campaign.
Important: Using this optional step may result in a high bounce rate for the campaign. If you are using the SES email platform, this can result in a probation warning email from Amazon. We advise that if you wish to use this option, send an email to support@predictiveresponse.com so that we can assist in determining the best way to manage the campaign.
Missing Emails
- Add the email address to the contact record and save.
- Click the ‘Optin’ button on the contact record.
- The contact will be opted in to receive emails from any active campaigns they are in, or are added to.
Back to Top
 (0)
(0) (0)
(0)