Install Guide: CampaignFlow | Predictive Response
Install Guide: CampaignFlow
- Overview
- Install CampaignFlow
- Install InstantSend
- Campaign Page Layout
- Trigger Action Field
- Remote Site Settings
- We can help!
Overview
The CampaignFlow (CFL) application has been designed to allow you to setup rules that will automatically:
- Add your leads and/or contacts to your campaigns, or
- Change the status of existing campaign members
Use CFL as a standalone program or with the Predictive Adaptive Mailer (Predictive AM). To use the CampaignFlow application with Predictive AM you will also need to install our InstantSend application that allows leads/contacts added to a campaign in Salesforce to be added to the corresponding campaign in Predictive AM which then allows the new campaign members to start receiving the campaign emails.
Install Campaign Flow
To start the install process, you must have downloaded the installation from the Salesforce AppExchange or received an email from your Predictive Response representative.
- Use the provided link
- Click Continue
- Click Next
- Verify desired security access and click Next
- On the next screen, select Grant access to admins only, and click Next
- On the final screen, click Install.
![]() Important: It is best to grant access to your system admin(s) first and then modify the profiles that are assigned to the users that will be using the application.
Important: It is best to grant access to your system admin(s) first and then modify the profiles that are assigned to the users that will be using the application.
Install InstantSend
![]() Stop: If you are not using Campaign Flow with the Adaptive Mailer, skip this step.
Stop: If you are not using Campaign Flow with the Adaptive Mailer, skip this step.
- Use the provided link
- Log into Salesforce (if prompted)
- Click Continue
- On the popup window – Approve Third-Part Access, click Yes… and Continue
- Click Next
- On the next screen, select Grant access to all users, and click Next
- Click Install
Campaign Page Layout
Because CFL works with a campaign, it is suggested that you add a CFL section to your campaign page layout.
- Go to Setup
- Locate and expand Customize
- Expand Campaigns and select Page Layouts
- Select the page layout you are currently using in Salesforce and click Edit
- Click Related Lists on the layout grid menu and select Campaign Flow
- Drag the item to a location on your campaign page
- Click the Wrench icon to customize the data displayed in the section, we advise adding:
- Name: The name of the flow (unique identifier)
- Description: Optional
- Active: Check if active, un-check if inactive
- Existing Lead/Contact: The CFL will react to changes to the designated fields on an existing lead or contact in Salesforce
- New Lead/Contact: The CFL will react to when a new lead or contact is added to Salesforce
- Trigger Action: This is the connection that CFL uses with xPress to add the new campaign member to the campaign in xPress so that they can start receiving campaign emails
- Change Status: This is used when a campaign member requires a level change – such as being changed to Completed so that they stop receiving emails from the campaign
![]() Best Practices: A flow can be set to react to change in existing lead/contacts AND new leads/contacts if desired.
Best Practices: A flow can be set to react to change in existing lead/contacts AND new leads/contacts if desired.
Trigger Action Field
This field is required when using CFL with xPress. The value has to be added to the picklist field.
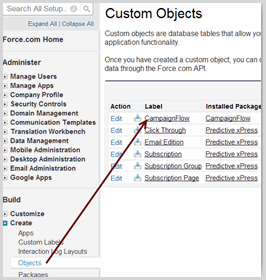
- Go to Setup
- Locate and expand Create
- Select Objects
- Click on the Campaign Flow Label
- Scroll down to the Custom Fields & Relationships section and locate the Trigger Action field
- Click on Trigger Action and then New in the Picklist Values section
- Add InstantSend for xPress
Remote Site Settings
![]() Stop: If you are not using CampaignFlow with the Adaptive Mailer, skip this step.
Stop: If you are not using CampaignFlow with the Adaptive Mailer, skip this step.
This setting should be included with the installation. We suggest that you confirm the setting.
- Go to Setup
- Locate and expand Security Controls
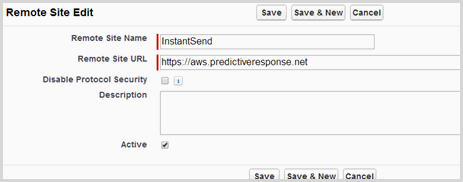
- Click on Remote Site Settings
- If a reference to InstantSend does not display, click on the New Remote Site Setting button and complete the fields as shown here:
We can help!
For assistance with the installation/configuration of a Predictive application or to request a training session, please use the link below:
https://help.predictiveresponse.com/support-session
Back to Top
 (0)
(0) (0)
(0)